Cách tạo calendar giống ứng dụng iCal của iPhone với jQuery
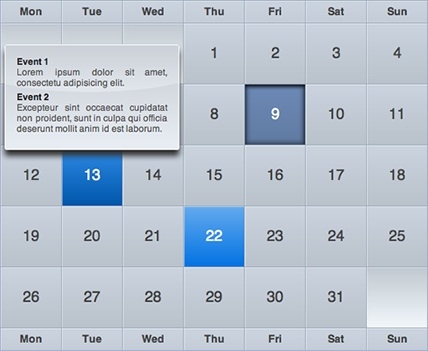
Hướng dẫn cách tạo calendar với sự kiện cho từng ngày giống ứng dụng iCal của iPhone.

Tạo một table thể hiện các ngày trong tháng
<table cellspacing="0">
	<thead>
		<tr>
			<th>Mon</th><th>Tue</th><th>Wed</th>
			<th>Thu</th><th>Fri</th><th>Sat</th>
			<th>Sun</th>
		</tr>
	</thead>
	<tbody>
		<tr>
			<td class="padding" colspan="3"></td>
			<td> 1</td>
			<td> 2</td>
			<td> 3</td>
			<td> 4</td>
		</tr>
		<tr>
			<td> 5</td>
			<td> 6</td>
			<td> 7</td>
			<td> 8</td>
			<td class="today"> 9</td>
			<td>10</td>
			<td>11</td>
		</tr>
		<tr>
			<td>12</td>
			<td class="date_has_event">
				13
			</td>
			<td>14</td>
			<td>15</td>
			<td>16</td>
			<td>17</td>
			<td>18</td>
		</tr>
		<tr>
			<td>19</td>
			<td>20</td>
			<td>21</td>
			<td class="date_has_event">
				22
			</td>
			<td>23</td>
			<td>24</td>
			<td>25</td>
		</tr>
		<tr>
			<td>26</td>
			<td>27</td>
			<td>28</td>
			<td>29</td>
			<td>30</td>
			<td>31</td>
			<td class="padding"></td>
		</tr>
	</tbody>
	<tfoot>
		<th>Mon</th><th>Tue</th><th>Wed</th>
		<th>Thu</th><th>Fri</th><th>Sat</th>
		<th>Sun</th>
	</tfoot>
</table>
Viết CSS để định dạng cho table này
table {
	border-collapse: separate;
	border: 1px solid #9DABCE;
	border-width: 0px 0px 1px 1px;
	margin: 10px auto;
	font-size: 20px;
}
td, th {
	width: 81px;
	height: 81px;
	text-align: center;
	vertical-align: middle;
	background: url(../img/cells.png);
	color: #444;
	position: relative;
}
th {
	height: 30px;
	font-weight: bold;
	font-size: 14px;
}
td:hover, th:hover {
	background-position: 0px -81px;
	color: #222;
}
td.date_has_event {
	background-position: 162px 0px;
	color: white;
}
td.date_has_event:hover {
	background-position: 162px -81px;
}
td.padding {
	background: url(../img/calpad.jpg);
}
td.today {
	background-position: 81px 0px;
	color: white;
}
td.today:hover {
	background-position: 81px -81px;
}
Chúng ta sẽ thêm sự kiện vào cho mỗi ngày, khi đưa chuột vào mỗi ngày, một popup sẽ hiện ra với thông tin sự kiện của ngày đó
<td class="date_has_event">
	13
	<div class="events">
		<ul>
			<li>
				<span class="title">Event 1</span>
				<span class="desc">Lorem ipsum dolor sit amet, consectetu adipisicing elit.</span>
			</li>
			<li>
				<span class="title">Event 2</span>
				<span class="desc">Excepteur sint occaecat cupidatat non proident, sunt in culpa qui officia deserunt mollit anim id est laborum.</span>
			</li>
		</ul>
	</div>
</td>
Viết CSS để định dạng cho popup về sự kiện của từng ngày
.events {
	position: relative;
}
.events ul {
	text-align: left;
	position: absolute;
	display: none;
	z-index: 1000;
	padding: 15px;
	background: #E7ECF2 url(../img/popup.png) no-repeat;
	color: white;
	border: 1px solid white;
	font-size: 15px;
	width: 200px;
	-moz-border-radius: 3px;
	-khtml-border-radius: 3px;
	-webkit-border-radius: 3px;
	-border-radius: 3px;
	list-style: none;
	color: #444444;
	-webkit-box-shadow: 0px 8px 8px #333;
}
.events li {
	padding-bottom: 5px;
}
.events li span {
	display: block;
	font-size: 12px;
	text-align: justify;
	color: #555;
}
.events li span.title {
	font-weight: bold;
	color: #222;
}
Cuối cùng, viết đoạn javascript để xử lý sự kiện
$(function () {
	$('.date_has_event').each(function () {
		// options
		var distance = 10;
		var time = 250;
		var hideDelay = 500;

		var hideDelayTimer = null;

		// tracker
		var beingShown = false;
		var shown = false;

		var trigger = $(this);
		var popup = $('.events ul', this).css('opacity', 0);

		// set the mouseover and mouseout on both element
		$([trigger.get(0), popup.get(0)]).mouseover(function () {
			// stops the hide event if we move from the trigger to the popup element
			if (hideDelayTimer) clearTimeout(hideDelayTimer);

			// don't trigger the animation again if we're being shown, or already visible
			if (beingShown || shown) {
				return;
			} else {
				beingShown = true;

				// reset position of popup box
				popup.css({
					bottom: 20,
					left: -76,
					display: 'block' // brings the popup back in to view
				})

				// (we're using chaining on the popup) now animate it's opacity and position
				.animate({
					bottom: '+=' + distance + 'px',
					opacity: 1
				}, time, 'swing', function() {
					// once the animation is complete, set the tracker variables
					beingShown = false;
					shown = true;
				});
			}
		}).mouseout(function () {
			// reset the timer if we get fired again - avoids double animations
			if (hideDelayTimer) clearTimeout(hideDelayTimer);

			// store the timer so that it can be cleared in the mouseover if required
			hideDelayTimer = setTimeout(function () {
				hideDelayTimer = null;
				popup.animate({
					bottom: '-=' + distance + 'px',
					opacity: 0
				}, time, 'swing', function () {
					// once the animate is complete, set the tracker variables
					shown = false;
					// hide the popup entirely after the effect (opacity alone doesn't do the job)
					popup.css('display', 'none');
				});
			}, hideDelay);
		});
	});
});
Download source code và xem demo của bài viết này bên dưới.
